Ceiling water damage can sneak up on you, often starting as a small stain that hints at bigger problems. You might be wondering what steps you can take to address this before it escalates. From identifying signs of damage to understanding how to fix leaks, knowing the right approach is essential. Let’s explore effective strategies that can save you time and money, ensuring your home stays safe and dry.
Key Takeaways
- Identify and investigate sources of water damage, such as leaks, to prevent further issues and preserve home integrity.
- Regularly inspect roofs and gutters for blockages and deterioration to avoid water buildup.
- Maintain humidity levels with dehumidifiers and ensure proper ventilation in moisture-prone areas.
- Schedule routine inspections for roofs and plumbing to catch potential problems early.
- Hire professionals for extensive damage, persistent odors, or structural concerns to ensure proper remediation.
Understanding Ceiling Water Damage
When you notice a stain on your ceiling, it’s essential to understand that this could indicate underlying water damage. This damage often stems from leaky roofs, plumbing issues, or condensation.
Ignoring it won’t just compromise your home’s aesthetics; it can lead to mold growth and structural problems, which can be expensive to fix.
You should investigate the source promptly. Check for leaks in your roof or around plumbing fixtures, and consider consulting a professional if it’s beyond your expertise.
Addressing the root cause is vital before tackling ceiling repair. Remember, timely action preserves your home’s integrity and enhances your sense of belonging in a safe, well-maintained environment.
Don’t wait—take control of your home’s health today.
Identifying Signs of Ceiling Water Damage
When checking for ceiling water damage, keep an eye out for discoloration and stains; these are often your first clues.
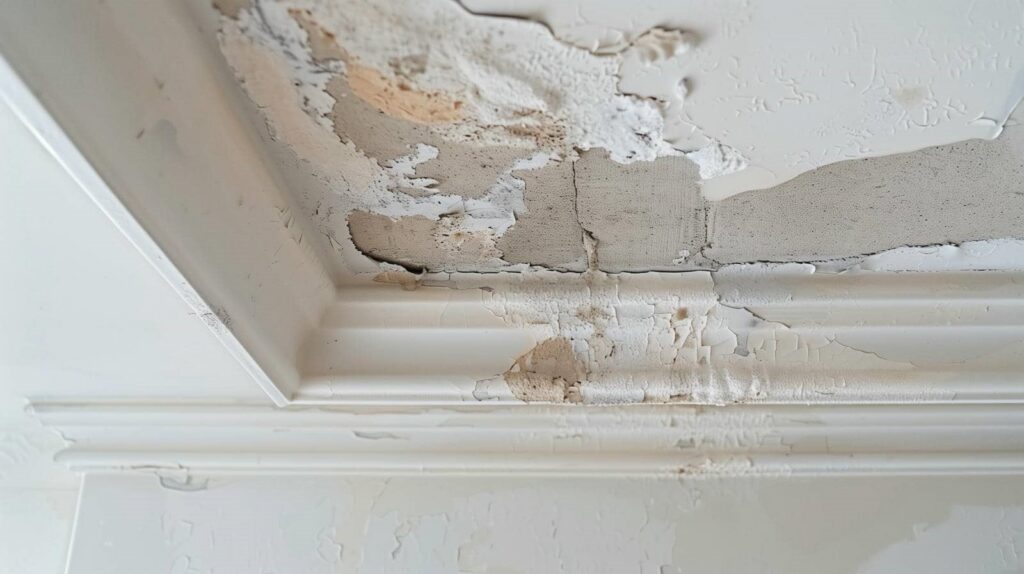
You might also notice peeling paint or wallpaper, which can indicate moisture lurking beneath.
Addressing these signs early can save you from more extensive repairs down the line.
Discoloration and Stains
While you mightn’t always notice it immediately, discoloration and stains on your ceiling are often the first indicators of water damage. These unsightly marks can range from yellowish-brown patches to darker spots, signaling potential leaks.
If you spot them, it’s vital to act fast. Begin with stain removal techniques to prevent further damage. You can use a mixture of water and mild detergent to clean the area gently, but make certain you identify the source of the water first.
Once the ceiling is clean, consider color matching for touch-ups. Finding the right paint shade can help restore your ceiling’s appearance, making your space feel like home again.
Don’t let those stains linger—address them promptly to maintain your sanctuary.
Peeling Paint or Wallpaper
If you notice peeling paint or wallpaper on your ceiling, it’s likely a sign of underlying water damage that requires immediate attention. This issue often stems from leaks or excess humidity, so don’t ignore it.
Start by carefully examining the affected area to identify the source of the moisture. Once you pinpoint the leak, you’ll need to fix it to prevent further damage.
For peeling wallpaper, consider paint removal before reapplying or replacing it. Removing damaged wallpaper can reveal more extensive issues hiding beneath.
After addressing the source, let the area dry completely. Then, you can repaint or reapply wallpaper, ensuring a fresh look while safeguarding against future water damage.
Taking these steps restores your ceiling and enhances your home’s value.
How to Assess the Source of Ceiling Water Damage?
To assess the source of ceiling water damage, start by inspecting for visible leaks in the ceiling and surrounding areas.
Next, check your roof and gutters for any signs of blockage or deterioration that could be allowing water to seep in.
Finally, don’t overlook plumbing issues, as hidden pipes can often be the culprit behind unexpected leaks.
Inspect for Visible Leaks
When you notice water stains on your ceiling, addressing the issue promptly is essential to prevent further damage.
Start with effective leak detection by inspecting for visible leaks. Use these inspection techniques to assess the situation:
Look for discoloration: Dark spots often indicate moisture.
Check for peeling paint or wallpaper: This can signal underlying water issues.
Examine light fixtures: Water pooling around lights can be a serious hazard.
Inspect pipes and HVAC units: Look for condensation or dripping.
Check Roof and Gutters
One of the most essential steps in evaluating the source of ceiling water damage is checking your roof and gutters.
Start with thorough roof inspections; look for missing shingles, cracks, or signs of wear. Even small issues can lead to significant leaks, so don’t overlook anything.
Next, focus on gutter maintenance. Verify your gutters are clean and free from debris, allowing water to flow freely. Clogged gutters can overflow, causing water to seep into your home.
During heavy rain, observe where water falls; if it’s pooling near your foundation, you might’ve a bigger problem.
Assess Plumbing Issues
While you might initially focus on the roof and gutters, evaluating plumbing issues is essential for identifying the source of ceiling water damage.
Start with thorough plumbing inspections to rule out hidden leaks. Here’s how to effectively assess your plumbing:
Inspect visible pipes: Look for signs of moisture or corrosion.
Check fixtures: Examine faucets and toilets for any leaks or drips.
Monitor water pressure: Sudden changes can indicate a problem.
Utilize leak detection tools: Consider using moisture meters to find hidden leaks.
Safety Precautions Before Starting Repairs
Before diving into repairs, it’s essential to ensure your safety and that of others in the home. Start by wearing protective gear, like gloves and goggles, to shield yourself from debris and potential hazards. Make sure you’ve got a hard hat if there’s a risk of falling materials.
Next, address electrical safety: turn off the power to affected areas to prevent shocks. Use a voltage tester to confirm that no live wires are present before you start working. If you’re unsure about any electrical components, consult a licensed electrician.
Finally, keep your workspace well-ventilated, especially if you’re using chemicals or materials that emit fumes. Taking these precautions protects you and fosters a safer environment for everyone in your home.
Fixing Roof Leaks to Avoid Ceiling Water Damage
After confirming your safety, addressing roof leaks is the next critical step in preventing ceiling water damage.
Start with a thorough roof inspection to identify any potential issues. Regular leak detection is key; even small leaks can lead to significant damage over time.
Here’s how to tackle roof leaks effectively:
Examine shingles: Look for cracks, missing pieces, or wear.
Check flashing: Verify it’s secure and sealed properly around chimneys or vents.
Inspect gutters: Clean them regularly to prevent water buildup.
Seal any gaps: Use roofing sealant to cover small holes or cracks.
Best Materials for Effective Ceiling Repairs
When it comes to repairing your ceiling, choosing the right materials is essential for a lasting fix.
You’ll want to weigh the benefits of drywall versus plaster options, opt for mold-resistant paint, and explore ceiling tile alternatives that suit your needs.
Each choice plays an important role in ensuring your ceiling remains protected and aesthetically pleasing.
Drywall Versus Plaster Options
Choosing between drywall and plaster for ceiling repairs can greatly impact the outcome of your project, especially if you’re dealing with water damage.
Both materials have their unique strengths, so it’s important to weigh your options carefully.
Drywall advantages: It’s quicker to install and typically more cost-effective.
Plaster benefits: Offers a more traditional look and superior durability for long-lasting repairs.
Drywall: Easier to patch and sand, making it ideal for DIY projects.
Plaster: Provides better sound insulation and can create intricate designs.
Ultimately, your choice should align with your aesthetic preferences, budget, and the extent of the damage.
Mold-Resistant Paint Selection
To effectively combat mold growth after addressing ceiling water damage, selecting the right mold-resistant paint is essential. Look for paints specifically labeled as mold-resistant, as they contain antimicrobial agents that help with mold prevention.
These paints resist mold and offer impressive durability, ensuring your ceiling stays protected for years.
When choosing a finish, opt for satin or semi-gloss, as these surfaces are easier to clean and less prone to moisture retention.
Before applying, make sure the ceiling is completely dry and prepped to enhance adhesion.
Ceiling Tiles Alternatives
Exploring alternatives to traditional ceiling tiles can greatly enhance the effectiveness of your ceiling repairs.
Consider these options that provide durability and style:
Acoustic Panels: Perfect for sound absorption, they improve room acoustics while looking modern.
Drop Ceilings: Easily installed and accessible, they allow for quick repairs and maintenance.
Decorative Tiles: Available in various designs, these tiles can transform your space while masking any damage.
Fiber Reinforced Materials: These are sturdy and moisture-resistant, ideal for areas prone to water damage.
How to Control Moisture Effectively
Although you mightn’t notice it right away, controlling moisture effectively is essential for preventing ceiling water damage.
Start by maintaining humidity control in your home. Use dehumidifiers in damp areas, especially basements, to keep excess moisture at bay.
Regularly check and fix any leaks in pipes or roofs, as these can lead to significant issues.
Additionally, installing moisture barriers in vulnerable areas, like attics and crawlspaces, can prevent humidity from seeping into your ceilings.
Ensure proper ventilation in kitchens and bathrooms to allow moist air to escape.
By being proactive and mindful of these strategies, you’ll create a healthier environment and protect your ceilings from potential water damage.
Taking these steps fosters a sense of belonging in your home.
When to Hire Water Damage Pros?
When should you consider bringing in water damage professionals? If you’re facing significant ceiling water damage, it’s vital to act quickly.
Here are some signs that indicate it’s time to call in the experts:
- You notice extensive water stains or discoloration.
- There’s a persistent musty odor, suggesting mold growth.
- The damage affects structural components or electrical systems.
- You need a thorough water damage assessment to prevent further issues.
Professional restoration teams have the tools and expertise to mitigate damage effectively.
They can help you understand the extent of the problem and ensure your home is restored safely and efficiently.
Don’t hesitate to reach out; your peace of mind is worth it!
Preventing Future Water Damage With Regular Maintenance
To keep your home safe from future water damage, regular maintenance is essential. Schedule regular inspections of your roof and plumbing to catch issues early.
Seasonal maintenance tasks, like gutter cleaning, prevent water buildup that can lead to leaks. Verify your moisture barriers are intact, as they protect against dampness seeping through walls and ceilings.
Don’t overlook ventilation systems; proper airflow helps reduce humidity levels, further aiding in water damage prevention.
By committing to these practices, you create a safe environment for your family, fostering a sense of belonging and security in your home.
Knowing When to Call in the Experts for Ceiling Issues
Recognizing the signs of ceiling issues early can save you from costly repairs down the line. When you notice any unusual changes, it’s time to contemplate professional intervention for an expert assessment.
Here are key signs to watch for:
- Water stains or discoloration on the ceiling
- Cracks or bulges that seem to worsen
- Musty odors indicating hidden mold
- Increased humidity levels in your home
Ignoring these signs might lead to more significant damage and expenses.
By calling in experts, you ensure a thorough evaluation and gain peace of mind. They’ll provide tailored solutions to address the root cause and protect your home effectively.
Don’t hesitate—your ceiling’s health is worth the investment.
Frequently Asked Questions
How Quickly Should I Address Ceiling Water Damage?
You should address ceiling water damage immediately. Start with a ceiling inspection to identify water sources. The sooner you act, the less damage you’ll face, fostering a safer, more comfortable environment for you and your loved ones.
Can I Paint Over Water-Damaged Ceilings?
You can’t just paint over water-damaged ceilings like a fresh coat on a canvas. First, address those water stains and complete necessary ceiling repairs to ensure lasting results and prevent future issues. Then, paint away!
Will Insurance Cover Ceiling Water Damage Repairs?
Yes, most insurance policies cover ceiling water damage repairs, but it depends on your specific plan. Review your policy details, and don’t hesitate to contact your insurer for clarification on coverage and claims processes.
What Are Temporary Fixes for Ceiling Leaks?
When you spot a leak, think of it as a stubborn raincloud. Use buckets for water diversion and place tarps for leak detection. These temporary fixes will help protect your space until permanent repairs arrive.
How Can I Tell if Mold Is Present?
To identify mold, look for signs of moisture like water stains or dampness. Use mold identification techniques such as visual inspections and a moisture meter. Trust your instincts; if it smells musty, investigate further.
Conclusion
Addressing ceiling water damage promptly can save you time and money in the long run. Remember, “an ounce of prevention is worth a pound of cure.” By staying vigilant for signs, fixing leaks, and maintaining proper ventilation, you can protect your home from further damage. Don’t hesitate to call in the experts when needed; it’s better to be safe than sorry. Taking these steps will ensure your ceiling remains in top condition for years to come.