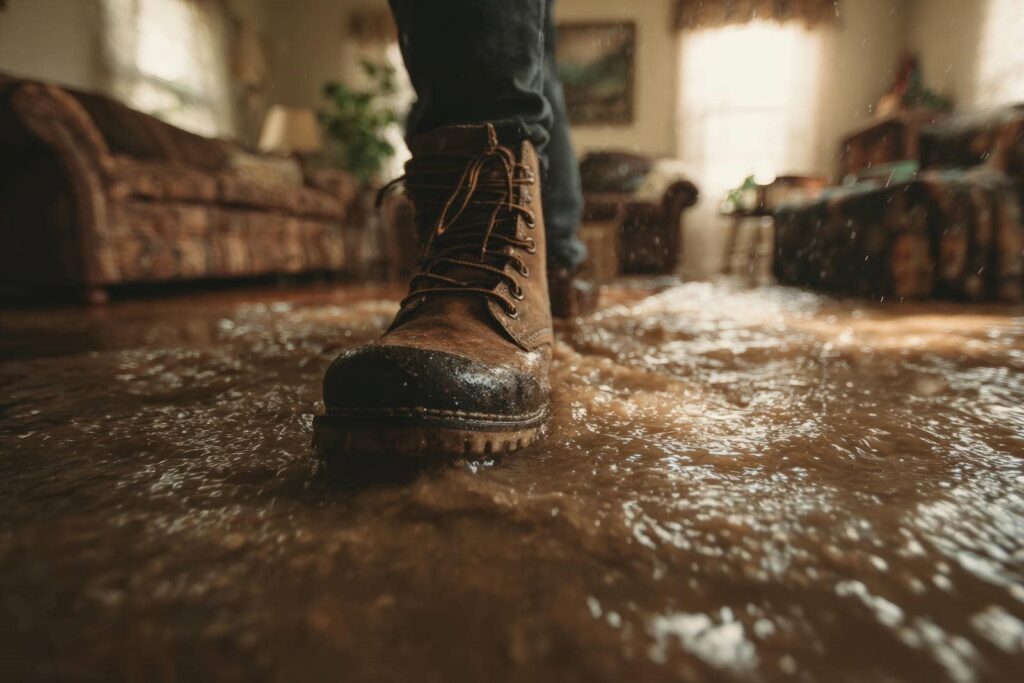
Water removal is just the beginning of the restoration process; what follows is vital for ensuring long-term safety and integrity. It’s essential to conduct thorough inspections and address hidden moisture risks. By methodically evaluating structural integrity and air quality, you’ll set the stage for a successful recovery. But what specific steps should you take to ensure the effectiveness of your efforts? Let’s explore ten important tips that can help you achieve quality assurance post-water removal.
Key Takeaways
- Conduct a thorough final walkthrough, checking for any residual moisture and assessing structural integrity of affected areas.
- Utilize moisture detection tools to confirm complete water extraction and identify any hidden moisture sources.
- Review restoration documentation to ensure accuracy and compliance with industry standards and protocols.
- Perform air quality testing to detect lingering contaminants and improve air quality through purification methods.
- Implement preventive measures, like regular inspections and proper drainage systems, to reduce future water intrusion risks.
Inspect the Affected Areas Thoroughly
Before you proceed with any restoration work, it’s essential to inspect the affected areas thoroughly. Start by evaluating the extent of the water damage. Use various inspection techniques, such as visual checks and moisture meters, to identify visible and hidden issues.
Pay close attention to walls, floors, and ceilings, as these can harbor moisture and mold if overlooked. Document your findings, noting areas with discoloration, warping, or unusual odors.
This detailed evaluation helps you prioritize repairs and ensures you address all potential hazards. Remember, thorough inspections can prevent future complications, saving you time and resources down the line.
Engaging with this meticulous process fosters a sense of control and community, as you’re not just restoring your space but also preserving its integrity for everyone involved.
Take pride in your diligence; it’s a step toward a safe, welcoming environment.
Check for Hidden Moisture
While you may have completed the initial inspection, it’s essential to check for hidden moisture that could undermine your restoration efforts. Ignoring these areas can lead to mold growth and further damage.
Use the following methods to ensure thorough moisture mapping:
Infrared Cameras: Utilize these tools to detect temperature variations that indicate hidden leaks behind walls or ceilings.
Moisture Meters: Employ these devices on surfaces to quantify moisture levels and identify problem areas that aren’t visible.
Thermal Imaging: This technique helps visualize moisture intrusion, enabling you to pinpoint leaks and areas needing attention.
Investigate Baseboards and Carpeting: Remove these materials, as moisture can accumulate underneath, often unnoticed.
Assess Structural Integrity
After removing water, you need to carefully inspect the walls and ceilings for any signs of damage or warping.
Next, check the foundation stability, as compromised structures can lead to serious issues down the line.
Finally, evaluate the floor condition to ascertain there are no hidden hazards that could affect safety and usability.
Inspect Walls and Ceilings
As you assess the structural integrity of walls and ceilings post-water removal, it’s essential to look for signs of damage that could compromise safety.
Conducting a thorough inspection helps ensure your space remains secure and comfortable.
Focus on these key areas:
Wall discoloration signs: Look for patches or stains indicating moisture retention.
Ceiling damage assessment: Check for sagging or bulging, which may suggest water accumulation.
Cracks and fissures: Examine for new or widening cracks that could signal structural issues.
Mold growth: Identify any visible mold, as it can affect air quality and health.
Check Foundation Stability
Ensuring the stability of your foundation is critical, especially following water damage, since even minor issues can escalate into significant structural problems.
Start with a thorough foundation inspection. Look for cracks, shifting, or settling that may indicate underlying issues. A detailed stability assessment should include monitoring for water pooling around the foundation, which can compromise its integrity.
Pay attention to any signs of mold or mildew, as these can also hint at moisture-related problems. If you notice anything concerning, don’t hesitate to consult a professional.
Evaluate Floor Condition
Once you’ve assessed the foundation’s stability, the next step is to evaluate the condition of your floors. This evaluation is essential to ensure safety and longevity.
Here are some key aspects to take into account:
Check for Warping: Inspect if your floor material, like hardwood or laminate, exhibits any warping due to moisture.
Look for Mold: Examine corners and under furniture for signs of mold, which can develop if drying techniques weren’t effective.
Test for Soft Spots: Walk across the floor to identify any soft spots indicating potential structural issues.
Assess Finish Damage: Evaluate if the finish is peeling or bubbling, as this can signal water damage that needs addressing.
Taking these steps ensures your floors remain safe and sound for years to come.
Verify Air Quality
How can you be certain that the air quality in a space is safe after water removal?
Begin with air quality testing to assess any lingering contaminants. Use a reliable testing kit or hire a professional to ensure accuracy. Look for mold spores, volatile organic compounds (VOCs), and other pollutants that may have emerged during the water exposure.
Once you’ve identified potential hazards, employ air purification methods to eliminate them. HEPA filters are particularly effective at trapping microscopic particles, improving overall air quality.
Consider using ozone generators carefully, as they can neutralize odors and pollutants but require strict adherence to safety guidelines.
After treatment, perform another round of air quality testing to verify improvements. This step confirms that your efforts are effective and that the space is safe for everyone.
Prioritizing air quality fosters a healthier environment and nurtures a sense of belonging and security for all occupants.
Monitor for Mold Growth
After water removal, it’s essential to monitor for mold growth to ensure a safe environment.
You should look for signs like musty odors, discoloration on surfaces, and increased humidity levels.
Implementing prevention techniques, such as maintaining proper ventilation and using dehumidifiers, can greatly reduce the risk of mold development.
Signs of Mold
Mold can silently invade your space, often thriving in damp conditions left behind after water removal.
It’s essential to monitor for signs of mold growth to ensure your environment remains safe and healthy.
Here are four key indicators to watch for:
Unpleasant Odor: A musty smell often signals mold types like Stachybotrys or Aspergillus.
Visual Spots: Look for black, green, or white spots on walls, ceilings, or hidden areas.
Increased Allergies: Unexplained sneezing or respiratory issues may indicate mold exposure.
Peeling Paint or Wallpaper: This can be a sign of moisture retention due to hidden mold.
Prevention Techniques
To effectively prevent mold growth, it’s crucial to implement monitoring techniques that keep dampness in check.
Regularly inspect areas prone to water damage, such as basements and around windows, for signs of moisture. Invest in moisture barriers to shield susceptible spaces, reducing the likelihood of mold proliferation.
Use hygrometers to measure humidity levels and aim to maintain them below 60%. If you detect excess moisture, promptly address leaks and improve ventilation. Additionally, consider using dehumidifiers in high-humidity environments.
By establishing a routine monitoring schedule, you foster a proactive approach towards mold prevention, creating a healthier living space for everyone.
Ensure Proper Drying Equipment Usage
When you’re dealing with water removal, using the right drying equipment is crucial for preventing further damage and ensuring a thorough restoration process.
Proper drying techniques can make a significant difference, so pay attention to equipment maintenance to maximize efficiency.
Here are four key steps to take into account:
Choose the Right Dehumidifiers: Select units based on the size of the affected area and the volume of water.
Use Air Movers Effectively: Position air movers strategically to enhance airflow, targeting wet surfaces to speed up evaporation.
Monitor Humidity Levels: Regularly check humidity using a hygrometer, ensuring levels drop to appropriate ranges.
Inspect Equipment Regularly: Keep an eye on your drying equipment’s condition, addressing any maintenance needs promptly to ensure peak performance.
Confirm Complete Water Extraction
To confirm complete water extraction, you need to inspect the affected areas thoroughly, ensuring no moisture remains hidden.
Utilize moisture detection tools to accurately assess the levels of humidity within the materials and environment.
This systematic approach ensures that every inch is accounted for, preventing future complications.
Inspect Affected Areas Thoroughly
While you might believe that water removal has been thoroughly completed, it’s crucial to inspect the affected areas meticulously to confirm this.
After all, unseen water damage can lead to significant issues down the line. Use these inspection techniques to guide your thorough checks:
Visual Inspection: Look for signs of discoloration or mold growth on walls and ceilings.
Check Baseboards: Inspect for warping or swelling, which may indicate trapped moisture.
Examine Flooring: Tap on tiles or floorboards; hollow sounds can signal water beneath.
Assess Fixtures: Verify faucets and plumbing areas are dry, as leaks can persist unnoticed.
Utilize Moisture Detection Tools
Utilizing moisture detection tools is vital for confirming complete water extraction after a flooding incident or water damage event.
These advanced technology devices, like moisture meters and thermal imaging cameras, help you identify hidden moisture that may linger in walls, floors, and other surfaces. By systematically scanning affected areas, you can pinpoint trouble spots that might lead to mold growth or structural damage.
It’s important to follow a methodical approach, ensuring you cover every corner and crevice. Regular checks with these tools provide peace of mind and foster a sense of community among those sharing similar experiences.
Embracing moisture detection technologies can help you protect your home and promote a safe, healthy environment for you and your loved ones.
Review Restoration Documentation
As you explore the restoration documentation, it’s crucial to focus on the specifics that illustrate the effectiveness of the water removal process. This ensures compliance with restoration protocols and enhances documentation accuracy.
Here are key aspects to examine:
Water Removal Techniques: Review which methods were used, noting their effectiveness in different areas of your property.
Moisture Levels: Look for recorded moisture readings over time, confirming the success of the drying process.
Equipment Utilization: Check the types of equipment deployed, verifying that they align with industry standards.
Final Reports: Confirm that all reports detail the entire process, from initial assessment to final results, providing a thorough overview.
Conduct Final Walkthrough
Once you’ve reviewed the restoration documentation, it’s essential to conduct a thorough final walkthrough to ascertain every aspect of the water removal process meets quality standards.
Begin your final inspection by referencing your quality checklist, ensuring each item is meticulously addressed. Check for any signs of residual moisture, as lingering dampness can lead to mold growth. Assess the structural integrity of affected areas, confirming that repairs align with industry standards.
Pay close attention to flooring, walls, and ceilings, looking for any discoloration or irregularities. Don’t forget to evaluate the efficiency of dehumidifiers and fans used during the drying process.
Engage with your team during this walkthrough; their insights can provide valuable information on any overlooked details. Document your findings to create a clear record, reinforcing the commitment to quality that fosters trust and belonging in your community.
A thorough final inspection ensures you leave no stone unturned in achieving ideal results.
Implement Preventive Measures
To ensure long-term success in preventing future water damage, it’s crucial to implement effective preventive measures following water removal.
By adopting structured preventive strategies, you can greatly reduce the risk of recurrence. Here are four essential steps to take into account:
Regular Inspections: Schedule periodic assessments of your property to identify any potential vulnerabilities.
Install Drainage Systems: Confirm proper drainage around your foundation to divert water away from your home.
Seal Cracks: Regularly check and seal any cracks in walls or foundations that could allow water intrusion.
Maintenance Scheduling: Create a routine for maintaining gutters and downspouts, confirming they’re clear and functioning properly.
Frequently Asked Questions
How Long Does the Quality Assurance Process Typically Take?
Quality assurance typically takes anywhere from a few hours to several days, depending on the project’s complexity. You should expect a thorough evaluation within this time frame, ensuring everything meets the required standards for safety and effectiveness.
What Tools Can I Use to Check for Hidden Moisture?
To uncover hidden moisture, you’ll want to wield moisture meters and thermal cameras like a detective with a magnifying glass. These tools help you methodically assess and ensure your space is completely dry and safe.
Can I Perform Quality Assurance Myself, or Hire a Professional?
You can perform a DIY assessment to check for moisture, but a professional evaluation ensures completeness. Consider your skills and equipment—if in doubt, hiring an expert provides peace of mind and a detailed analysis.
What Signs Indicate That Air Quality Is Compromised?
If you notice increased airborne pollutants, persistent odors, or rising humidity levels, air quality’s likely compromised. Trust your instincts; these signs often indicate underlying issues needing immediate attention to ensure a safe, healthy environment.
How Often Should I Monitor for Mold Growth After Water Removal?
You should monitor for mold growth at least once a week after water removal. Implement mold prevention strategies consistently, adjusting your monitoring frequency based on environmental conditions to ensure a safe, healthy living space.
Final Thoughts
Ensuring quality assurance after water removal is like piecing together a puzzle—every detail matters for the bigger picture. By diligently inspecting for hidden moisture, evaluating structural integrity, and verifying air quality, you safeguard your space from future damage. Regular monitoring for mold and confirming complete extraction are essential steps. Don’t overlook the importance of thorough documentation and preventive measures; they’re your best defense against water-related issues down the line. Stay proactive and protect your environment.