You might think ceiling water damage is a hassle you can ignore, but addressing it promptly can save you from more costly repairs down the line. Start by identifying the leak’s source and evaluating the damage. You’ll need the right tools and techniques to tackle the repairs effectively. So, what are the best methods to ensure your ceiling looks as good as new and stays that way? Let’s explore the most effective strategies.
Key Takeaways
- Identify and fix the leak source first to prevent further water damage before starting repairs.
- Sand damaged areas, apply stain-blocking primer, and repaint to restore ceiling aesthetics.
- Replace soft or sagging drywall sections to ensure structural integrity and prevent mold growth.
- Document all damage with photos for insurance claims and record-keeping during repairs.
- Consider hiring professionals for severe damage to ensure proper assessment and quality repairs.
What Causes Ceiling Water Damage and How Does It Affect You?
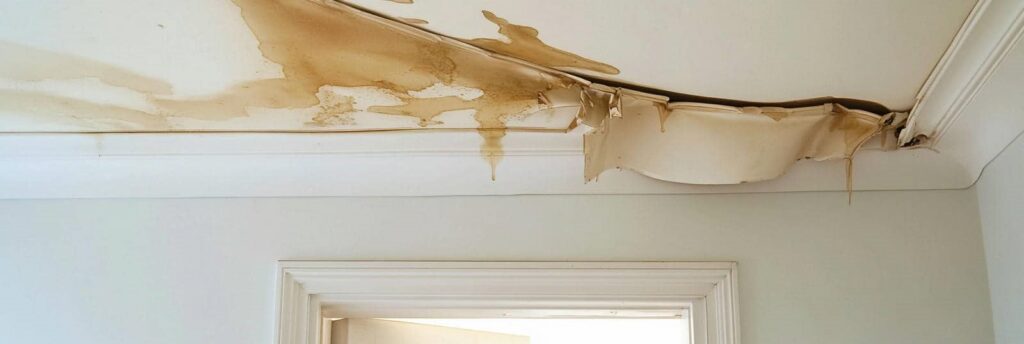
Ceiling water damage often stems from a few common culprits, such as leaky roofs, burst pipes, or faulty HVAC systems. Understanding the causes can help you take preventive measures.
Ignoring warning signs like stains or peeling paint may lead to serious consequences, including mold growth and structural damage. The effects aren’t just physical; they can impact your home’s value and your well-being.
Regular maintenance checks can help you identify types of issues early on. Simple solutions, like sealing roof leaks or repairing plumbing, can save you from expensive repairs down the line.
Assessing the Extent of Ceiling Water Damage
To assess the extent of ceiling water damage, start with a thorough visual inspection.
Look for stains, discoloration, or sagging areas, as these can indicate the severity of the issue.
Identifying the source of leaks is essential to prevent further damage and ensure effective repairs.
Visual Inspection Techniques
When evaluating the extent of water damage, a thorough visual inspection is essential.
Start your ceiling inspection by looking for discoloration or stains, which often indicate moisture buildup. Pay close attention to areas around vents, light fixtures, and any seams, as these spots are more susceptible to leaks.
Don’t forget to check for sagging or bulging sections, as this can be a sign of significant damage. Use a flashlight to illuminate dark corners and hidden areas, ensuring you don’t miss any signs of water damage.
Document your findings with photos to track the extent of the damage. By being diligent in your visual inspection, you set the stage for effective repair and restoration.
Identifying Source Of Leaks
How can you effectively identify the source of leaks causing ceiling water damage? Start with leak detection methods like moisture testing to pinpoint damp areas.
Conduct a plumbing inspection to rule out any hidden pipe issues. Don’t forget to check your roof; roof maintenance is essential for preventing leaks.
Look for insulation issues that could trap moisture, and assess drainage problems around your home. Effective weatherproofing techniques can also help mitigate future leaks.
Once you’ve identified the source, you can implement appropriate restoration methods to fix the damage. By taking these steps, you’re not just repairing; you’re protecting your home and ensuring a safe, comfortable environment for you and your loved ones.
Gather Essential Tools for Ceiling Water Damage Repair
Gathering the right tools is essential for effective ceiling water damage repair. Start with a tools checklist to ensure you have everything you need.
You’ll want a bucket for catching any drips, a sponge for soaking up excess water, and a ladder to reach high spots safely.
Repair essentials include a putty knife for smoothing out patching compound and drywall tape for reinforcing seams.
Don’t forget safety gear like gloves and goggles to protect yourself during the process.
A utility knife is also handy for cutting drywall, and a paint roller will help with a smooth finish.
Having these tools at your fingertips makes the repair process smoother and helps you feel more confident in tackling the job.
DIY Methods for Minor Ceiling Water Damage
After you’ve assembled your tools, you can tackle minor ceiling water damage with some straightforward DIY methods.
First, locate the source of the leak and fix it to prevent further issues. Once that’s done, inspect the affected area for stains or peeling paint.
For minor repairs, sand the damaged spot lightly, apply a stain-blocking primer, and then repaint for a fresh look.
If there are any soft or sagging areas, you might need to replace a small section of drywall.
Remember, regular ceiling maintenance can help catch problems early, saving you time and money.
With these simple steps, you’ll restore your ceiling and boost your home’s overall appearance.
Is It Time to Call in the Experts for Water Damage?
If you notice signs of severe damage, like sagging or discoloration, it might be time to call in the experts.
DIY methods can only go so far, and attempting repairs without the right tools or knowledge can lead to bigger issues.
Weighing the costs of professional help against the potential risks of inadequate repairs is essential for getting your ceiling back in shape.
Signs of Severe Damage
When you notice peeling paint, discoloration, or a musty odor in your ceiling, it’s essential to assess the situation promptly. These signs often indicate severe water damage that could lead to mold growth and serious health risks.
Take a closer look for ceiling stains or sagging areas, as these might signal underlying insulation issues or compromised structural integrity. If you see any of these symptoms, don’t delay in reaching out for professional help.
Ignoring them can lead to difficult repair timelines and increased costs. Addressing water damage early protects your home and ensures a safe environment for you and your loved ones.
Trust your instincts—if you’re unsure, it’s better to call in the experts.
DIY Limitations and Risks
While tackling ceiling water damage on your own might seem tempting, DIY methods often come with significant limitations and risks.
You might face DIY pitfalls like improper moisture detection, leading to ongoing issues. Safety precautions can be easily overlooked, putting you at risk for injuries.
When it comes to material selection, not all products are suitable for water damage repair, which can result in subpar results. Additionally, your chosen repair techniques mightn’t effectively address the underlying problems.
Cost considerations are another factor; what seems cheaper initially could end up costing more if the issue worsens.
At times, it’s wiser to call in the experts to ensure a thorough and safe repair process.
Cost-Benefit Analysis
Evaluating whether to tackle ceiling water damage yourself or hire professionals involves weighing the costs against the potential benefits.
Start with a cost evaluation: consider the materials, tools, and time you’d invest in a DIY approach. Compare this to the financial impact of hiring experts, who not only bring experience but also reduce the risk of further damage.
While DIY might save money upfront, think about the long-term consequences if the problem isn’t resolved properly. Hiring professionals can often prevent bigger issues down the line, saving you money in repairs later.
Ultimately, it’s about balancing immediate expenses with future savings. If you’re not confident in your skills, calling in the experts could be the wiser choice.
Choosing the Right Materials for Repairing Water-Damaged Ceilings
Next, think about repair aesthetics. You want your ceiling to look as good as it functions. Use paint that matches your existing décor and has mildew resistance to maintain a fresh appearance.
Additionally, if you’ve got textured ceilings, consider using a matching texture spray to achieve a seamless finish.
How to Prevent Future Ceiling Water Damage
To prevent future ceiling water damage, it’s essential to regularly inspect your roof and plumbing for leaks.
Make preventive maintenance a habit—check for signs of wear and tear, and address any issues immediately. Ascertain gutters and downspouts are clear, directing water away from your home.
Focus on moisture control by using dehumidifiers in damp areas like basements. Proper ventilation in bathrooms and kitchens can also reduce humidity levels.
If you notice condensation on windows or walls, act quickly to identify the source.
Consider using water leak detection systems that alert you to problems before they escalate.
Navigating Water Damage Insurance Claims
How can you effectively navigate the often complex world of water damage insurance claims? Start by understanding your policy coverage, as each plan varies considerably. Familiarize yourself with what’s included and excluded to avoid surprises later.
Next, prioritize thorough claim documentation. Keep detailed records of the damage, including photos and repair estimates, to support your claim effectively.
Here are a few key steps to follow:
- Review your insurance policy carefully to know your rights and obligations.
- Gather all necessary documentation, including invoices and repair estimates.
- Communicate promptly and clearly with your insurance adjuster to ensure a smoother process.
Cost Factors in Ceiling Water Damage Repair
When dealing with ceiling water damage repair, several cost factors come into play that can greatly impact your budget.
First, repair costs vary based on the severity of the damage and the extent of the restoration needed. Material choices can also influence expenses; opting for higher-quality materials might save you money in the long run.
Don’t forget labor expenses, as hiring experienced professionals can raise costs but ensure quality work. Your insurance coverage can help offset some of these costs, so always check your policy.
Finally, a thorough damage assessment is essential to identify the right restoration options. Understanding these factors can help you plan effectively and avoid surprises down the line.
Frequently Asked Questions
How Long Does It Take for Ceiling Water Damage to Dry Completely?
Ceiling water damage typically takes 3 to 7 days to dry completely, depending on drying techniques and moisture assessment. You can speed up drying by using fans and dehumidifiers to promote airflow and evaporation.
Can I Repaint a Water-Damaged Ceiling?
Yes, you can repaint a water-damaged ceiling. First, ensure proper ceiling preparation by fixing any issues and allowing it to dry. Then, choose a mold-resistant paint for the best results and durability.
What Are the Health Risks of Ceiling Water Damage?
Ceiling water damage can lead to mold exposure, which negatively impacts air quality. You might experience respiratory issues, allergies, or other health problems. Addressing the damage promptly helps ensure a safer, healthier home environment for everyone.
How Can I Identify Hidden Water Damage?
To identify hidden water damage, look for discoloration, peeling paint, or warped surfaces. Use moisture detection tools and conduct a thorough damage assessment. Trust your instincts; if something feels off, it probably is. You’re not alone.
Is Ceiling Mold Always a Sign of Water Damage?
Ceiling mold often indicates water damage, but not always. Different mold types thrive in moisture. To prevent issues, ensure proper ventilation, fix leaks quickly, and regularly inspect for moisture. Stay proactive to keep your space safe.
Final Thoughts
In the journey of homeownership, addressing ceiling water damage is like tending to a weary tree; you must nurture it back to health. By understanding the causes and employing the right repair methods, you restore your ceiling and safeguard your space from future storms. Regular maintenance acts as your umbrella, shielding your home from unexpected leaks. Stay vigilant, and you’ll cultivate a safe haven, free from the shadows of water damage.