
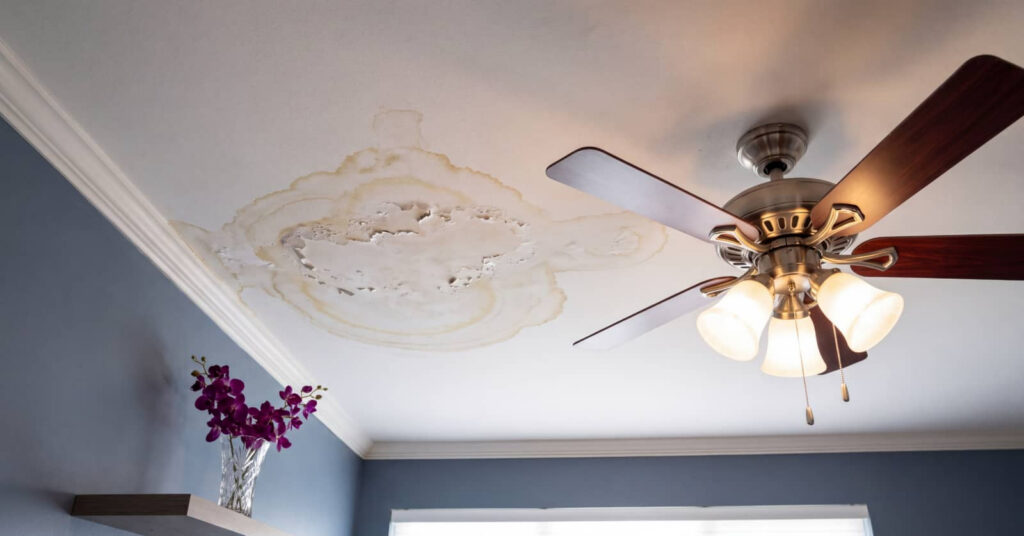
Does stopping a roof leak immediately really limit the damage, or only slow it down? You’ll need to trace the leak, protect the room below, and dry the insulation before staining turns into mold. Then you can remove damaged ceiling material, patch the roof, and restore the finish. The key is matching each repair step to the type of damage, because one missed detail can change everything.
Key Takeaways
- Stop the leak immediately with a tarp, roofing tape, or bucket to prevent further water intrusion and damage.
- Move furniture, cut power to wet outlets, and protect the room with plastic sheeting or drop cloths.
- Inspect ceiling stains, moisture, and sagging drywall to trace the leak and assess hidden water damage.
- Dry insulation and drywall quickly with fans and dehumidifiers, and remove moldy porous materials if needed.
- Repair the roof and restore the ceiling with proper patching, stain-blocking primer, texture matching, and repainting.
Stop the Roof Leak First
Before you repair anything else, you need to stop the active leak. You can act fast with emergency measures that keep water out and protect your space.
Place a bucket under drips, move valuables, and dry the area you can reach safely. If weather allows, apply temporary fixes like roofing tape, a tarp, or sealant over the suspect spot. Secure edges so wind won’t lift them.
Wear gloves and use stable footing; don’t climb onto a wet roof alone. If the leak worsens, call a qualified roofer right away. Your goal isn’t a permanent repair yet; it’s damage control.
When you limit water entry first, you give yourself time, reduce repair costs, and stay in control with the rest of the team.
Locate Ceiling Water Damage
Next, you should spot ceiling stains and map their edges to identify the affected area.
Then trace the water path from the stain back toward the roof leak, since water often travels before it shows up inside.
Check for hidden moisture with a meter or probe, because the visible stain may not show the full extent of damage.
Spot Ceiling Stains
Ceiling stains are often the first visible sign of a roof leak, and they can help you narrow down the source of water intrusion. You should inspect for yellow rings, brown patches, peeling paint, or sagging drywall.
Mark each spot, then compare stain size and shape to track active water damage. If the area feels damp, you need immediate moisture control and protective measures to limit spread.
Document the damage before any ceiling repair or stain removal begins, so your interior restoration plan stays organized.
As part of smart home maintenance, check nearby fixtures, attic insulation, and vents for related signs. These renovation tips help your crew work faster and keep your space safe.
Trace Water Path
Once you’ve marked the stains, trace the water path to locate the actual ceiling leak source. Start above the damage and work upward, following paint lines, drywall seams, and framing until you reach likely water sources.
Check vents, chimneys, skylights, plumbing penetrations, and roof edges first, since these often guide water across the ceiling before it shows up below. Use leak detection by comparing stain direction, drip points, and the highest wet mark.
You’re looking for the entry point, not just the visible damage. Take notes and photos as you go so your repair team can stay aligned. If you belong to a neighborhood crew or share maintenance tasks, clear observations help everyone act faster and avoid repeat damage.
Check Hidden Moisture
Now check for hidden moisture behind the visible stain, because ceiling damage often spreads farther than it appears.
You should inspect adjacent drywall, insulation, and framing for soft spots, dark edges, and peeling paint. Use moisture detection tools to map the wet area, then mark every reading so you can compare drying progress.
If the ceiling feels cool or you suspect trapped water, cut a small inspection opening and look for damp material.
Perform water testing from above only after you’ve confirmed the source is controlled, so you don’t worsen the leak.
Replace any saturated insulation and damaged board before sealing the cavity.
This careful check helps you and your crew stay aligned, avoid missed damage, and restore the space with confidence.
Protect the Room Under the Leak
Before you start patching the roof, move furniture, electronics, and anything else you can salvage out of the leak zone.
Cover what stays with plastic sheeting or drop cloths, and seal seams so stray drips don’t spread.
Use temporary coverings over flooring, baseboards, and built-ins to keep the room in the repair group, not the damage group.
Set up water collection with buckets, trays, or a tarp funnel under active drips, and empty them often.
Cut power to any wet outlets or fixtures nearby, and keep cords clear of standing water.
Open windows if conditions allow, and run fans only after the area is safe.
Protecting the room now helps your crew work faster and keeps your home ready for the next step.
Dry the Insulation and Drywall
After you’ve protected the room, dry the wet insulation and drywall as quickly as possible. Use fans and a dehumidifier to move air across the area and pull moisture out of hidden cavities.
If you can access the back side, open it for better insulation drying. Check surfaces with a moisture meter so you know when levels drop to normal. Keep wiring clear and power off until the area is safe.
- Aim airflow into the wet zone
- Run dehumidification continuously
- Inspect for soft spots
- Track moisture daily
When drywall stays swollen or crumbles, plan drywall repair with clean cuts and proper fastening.
Work methodically, and you’ll protect the structure and keep your repair team confident.
Remove Stained Ceiling Materials
Cut out and remove any ceiling materials that are stained, swollen, or soft once they’re fully dry. You’ll want to mark the damaged area with a straight line, then use a utility knife or drywall saw to make clean cuts.
Work carefully so you don’t tear surrounding ceiling materials. If you see water stains around the opening, extend the cut until you reach clean, dry material.
Bag the removed pieces right away to keep dust down and keep your workspace manageable. Wear gloves, eye protection, and a mask, and use a ladder that feels stable.
Keep the area organized so you and your crew can move efficiently. When you’re done, the opening should be neat, dry, and ready for the next repair step.
Check for Hidden Water Damage
With the damaged ceiling material removed, inspect the exposed area for hidden water damage that may extend beyond the visible stain. You’ll want to work methodically so you catch problems your crew can fix now, not later.
Use water detection tools and moisture mapping to trace wet framing, insulation, and subflooring.
- Probe wood for soft spots
- Check joints and fasteners
- Mark damp boundaries
- Note any swelling or discoloration
If readings stay elevated, expand the search to nearby cavities and roof deck sections.
Dry materials can still hide trapped moisture, so confirm each area before you close it up. When you document findings clearly, you help your repair team stay aligned and make the next steps faster, cleaner, and more reliable for everyone involved.
Treat Mold After a Roof Leak
After a roof leak, you need to identify mold growth quickly on drywall, insulation, framing, and other damp materials.
Wear proper PPE and isolate the area before you remove any visible mold.
If the contamination is extensive or the source stays wet, you should bring in a qualified remediation specialist.
Identify Mold Growth
Even a small roof leak can create hidden mold growth within 24 to 48 hours, especially in damp insulation, drywall, and ceiling cavities.
You’ll protect your home faster when you spot early signs and act with confidence. Check for:
- musty odors
- discoloration on paint or drywall
- fuzzy patches on wood or insulation
- peeling seams near the leak
Different mold types can appear as black, green, or white growth, and each needs prompt mold treatment.
Use a flashlight to inspect attic joists, vents, and corners after rain. Track any spreading stains or soft materials, since moisture often lingers behind surfaces.
If you notice recurring growth, your repair plan may need better drying and sealing.
Remove Mold Safely
If you find mold after a roof leak, stop the spread before you clean it. Wear gloves, goggles, and an N95 respirator, then isolate the area.
For small patches, use mold removal with safe techniques: scrub hard surfaces with detergent and water, then apply approved cleaning solutions. Don’t mix chemicals. Remove porous materials that stay damp, because they can hide colonies and raise health risks.
Dry framing, insulation, and drywall fast with fans and dehumidifiers. Improve ventilation improvement by opening windows when weather allows. Focus on moisture control first, or mold will return.
For large areas, recurring growth, or hidden damage, get professional help. You’re not alone in this; careful cleanup protects your home, supports mold prevention, and keeps your space healthier for everyone.
Patch the Roof Leak
Once you’ve located the leak, patch it with a roofing repair method that matches the material and damage type. You’ll get better results when you work with the same roof materials and use proven sealing techniques, so the repair blends in and lasts.
Clean the area, then apply the right patch, sealant, or replacement piece with firm pressure. Keep your crew focused on tight edges and overlap zones.
- Replace cracked shingles or tiles
- Seal small gaps with roofing cement
- Use flashing repair tape on seams
- Fasten loose metal panels securely
Check the patch after it sets, then test it with light water flow if conditions allow. When you handle it this way, you’re doing it like a pro and protecting your home with confidence.
Restore Ceiling Paint and Texture
After the leak is fixed and the area is dry, scrape away any loose paint, damaged texture, or stained material from the ceiling.
Feather the edges with fine-grit sandpaper so your repair blends cleanly. Apply a stain-blocking primer to the exposed area, and let it cure fully.
Next, match the ceiling texture by using a spray, brush, or knockdown technique that fits the surrounding finish. Build it in thin layers so the pattern stays consistent with the rest of the room.
Once the texture dries, apply paint restoration coats with a roller or brush, extending slightly beyond the repair for an even finish. Use the same sheen and color, and inspect under strong light.
With careful work, your ceiling can look like it belongs again.
Prevent Future Roof Leaks
To prevent future roof leaks, inspect the roof regularly and address small problems before they spread. You’ll protect your home and stay ahead of costly repairs by building a simple preventative maintenance routine.
Schedule regular inspections after storms and before seasonal changes, so your roof crew can spot worn shingles, cracked flashing, and blocked drainage early.
- Clear gutters and downspouts.
- Seal exposed nail heads.
- Replace damaged shingles fast.
- Check attic ventilation and moisture.
Keep a log of each inspection, photos, and repairs so you can track changes over time. If you notice staining, soft spots, or recurring leaks, call a qualified roofer right away.
When you stay consistent, you join other homeowners who keep their roofs strong, dry, and reliable.
Frequently Asked Questions
How Much Does Roof Leak Repair Usually Cost?
You’ll usually pay $150–$1,500, depending on cost factors like leak size, roofing material, and labor. DIY repairs can trim expenses, but you’ll want to inspect flashing, shingles, and underlayment carefully first.
Can I Stay Home During Roof Leak Repairs?
Yes, you can usually stay home during roof leak repairs if the repair process stays contained. You should stay safe by keeping clear of work zones, protecting valuables, and confirming access points with your contractor beforehand.
How Long Does Roof Leak Damage Cleanup Take?
You’ll usually finish roof leak damage cleanup in 1-7 days, depending on severity. Your cleanup timeline depends on drying, debris removal, and restoration methods; minor leaks won’t swallow your week whole, but major damage can.
Does Homeowners Insurance Cover Roof Leak Damage?
You’re usually covered if the leak came from a sudden event, but not wear and tear. Check your insurance policy, document damage, and start the claim process quickly to protect your coverage.
When Should I Call a Professional Roofer?
You should call a professional roofer when you spot repair signs like stains, missing shingles, or sagging. Schedule a roof inspection after storms, recurring leaks, or if you can’t safely access the damage yourself.
Wrap-Up
When you tackle roof leak damage, you’re really fighting a modern Trojan horse: water gets in quietly, then spreads fast. Stop the leak, dry the structure, remove damaged materials, and treat any mold before it grows legs. Patch the roof, then restore the ceiling so the repair looks complete. Finally, keep up with inspections and drainage upkeep. If you stay proactive, you’ll protect your home from the next storm and the next surprise.